


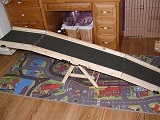
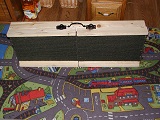
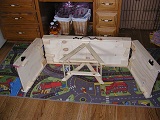
How to build a portable teeter totter like the one pictured below. It can be folded up to carry then opened up into a teeter totter when on location. This is the hardest piece of equipment to make. Remember to hover over images to enlarge them.
The Humans
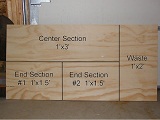 Step 1 is to cut out the base for the center and both end sections. Cut off
a 1'x2' piece from the end of the 2'x4' sheet of plywood, this is waste
material, then cut the remaining piece into two 1'x3' pieces and finally cut one
of the 1'x3' pieces into two 1'x1.5' pieces.
Step 1 is to cut out the base for the center and both end sections. Cut off
a 1'x2' piece from the end of the 2'x4' sheet of plywood, this is waste
material, then cut the remaining piece into two 1'x3' pieces and finally cut one
of the 1'x3' pieces into two 1'x1.5' pieces.

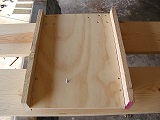 Step 2 is to make and attach the hinge/rail mounts. Cut 8 pieces 3" long from
the 1x3 furring strips. Four of these will be attached to the corners of the
base, attached from above the base with #8 3/4" wood screws counter sunk (1, 2,
3, and 4 in photo-hover over to see). Attach 2 other mounts (5 and 6) to one end
section and the other 2 (7 and 8) to the other end section.
Step 2 is to make and attach the hinge/rail mounts. Cut 8 pieces 3" long from
the 1x3 furring strips. Four of these will be attached to the corners of the
base, attached from above the base with #8 3/4" wood screws counter sunk (1, 2,
3, and 4 in photo-hover over to see). Attach 2 other mounts (5 and 6) to one end
section and the other 2 (7 and 8) to the other end section.
 Step 3 Clamp the center section and end sections together in the closed
position
then attach 2 hinges onto each end between the center section and an end
section.
Step 3 Clamp the center section and end sections together in the closed
position
then attach 2 hinges onto each end between the center section and an end
section.
 Step 4 is to make and attach the rail mounts/aligners.
Cut 6 pieces 3" long from the 1x2 furring strip. Two of the mounts (1 and 2) require
a 1/4" hole almost but not completely through at the dead center point when
layed flat for the leg pins. These are mounted at the mid point of the
center section. The other four mount 2 each on the end sections 2" from the
edge.
Step 4 is to make and attach the rail mounts/aligners.
Cut 6 pieces 3" long from the 1x2 furring strip. Two of the mounts (1 and 2) require
a 1/4" hole almost but not completely through at the dead center point when
layed flat for the leg pins. These are mounted at the mid point of the
center section. The other four mount 2 each on the end sections 2" from the
edge.
 Step 5 attaching the side rails. Cut two sets of two pieces 1.5' long and
one piece 3' long from the 1x3 furring strips, these will form the side rails
for one side. Connect one set of
these pieces onto the sides of the center section and end sections with 4
#6x1-1/2" wood screws for the center section and 2 screws for each end section.
The rails mount flush with the hinge/rail mounts from step 2. Flip the unit and connect the side rails on the other side in the same manner.
Step 5 attaching the side rails. Cut two sets of two pieces 1.5' long and
one piece 3' long from the 1x3 furring strips, these will form the side rails
for one side. Connect one set of
these pieces onto the sides of the center section and end sections with 4
#6x1-1/2" wood screws for the center section and 2 screws for each end section.
The rails mount flush with the hinge/rail mounts from step 2. Flip the unit and connect the side rails on the other side in the same manner.
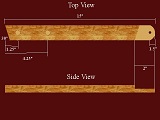 Step 6 is to make the legs, this is the most difficult part of the build.
Cut 4 pieces 15" long from the 1x3 furring strips, at one end make the cut at a 30
degree angle. At the other end drill a 1/4" hole dead center 1/2" from the
edge. Next use a router to remove a section 2" long by 3/8" deep from the end
with a hole in it. Now drill a 1/2" hole 1.25" from the end with the angle cut
and another 4.25" from the edge a 1/2" deep (not all the way through). Finally
round off the end with the hole on a sander.
Step 6 is to make the legs, this is the most difficult part of the build.
Cut 4 pieces 15" long from the 1x3 furring strips, at one end make the cut at a 30
degree angle. At the other end drill a 1/4" hole dead center 1/2" from the
edge. Next use a router to remove a section 2" long by 3/8" deep from the end
with a hole in it. Now drill a 1/2" hole 1.25" from the end with the angle cut
and another 4.25" from the edge a 1/2" deep (not all the way through). Finally
round off the end with the hole on a sander.
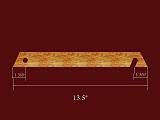 Step 7 is to make the leg cross bars.
Cut 2 pieces 13.5" long from the 1x3 furring strips cutting both
ends of each piece at a 30 degree angle. At both ends of both pieces
drill a 1/2" hole 1 3/8" from the end. One end of both cross bars
needs to be slotted, use a saw to make the slot up to the hole then a small
sanding drum on a dremel will smooth it out.
Step 7 is to make the leg cross bars.
Cut 2 pieces 13.5" long from the 1x3 furring strips cutting both
ends of each piece at a 30 degree angle. At both ends of both pieces
drill a 1/2" hole 1 3/8" from the end. One end of both cross bars
needs to be slotted, use a saw to make the slot up to the hole then a small
sanding drum on a dremel will smooth it out.
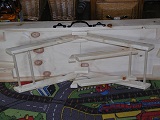
 Step 8 is to assemble the legs and cross bars. Cut the 1/2" dowel into 4 pieces 10" long.
Attach the cross bars to one of the dowels, 1 3/8" in from the ends of the
dowel, with glue
and brads. Insert the dowel with the cross bars attached into the upper 1/2" holes in a
set of legs, do not glue or use brads. Insert the other dowel into the
lower 1/2" holes with glue and brads. Then insert the other two dowels into
the other set of legs in the 1/2" holes with glue and brads. The legs are
complete and should look like the photo, remember to hover mouse over photo to
enlarge it.
Step 8 is to assemble the legs and cross bars. Cut the 1/2" dowel into 4 pieces 10" long.
Attach the cross bars to one of the dowels, 1 3/8" in from the ends of the
dowel, with glue
and brads. Insert the dowel with the cross bars attached into the upper 1/2" holes in a
set of legs, do not glue or use brads. Insert the other dowel into the
lower 1/2" holes with glue and brads. Then insert the other two dowels into
the other set of legs in the 1/2" holes with glue and brads. The legs are
complete and should look like the photo, remember to hover mouse over photo to
enlarge it.
 Step 9 is to attach the leg assembly to the center section. Cut the 1/4" dowel into
2 pieces 1 3/4" long. Cut 2 pieces 3" long from the of 1x2 furring strips.
Drill a hole most of the way through but not all the way dead center in the
pieces of furring strip. Insert the dowels through the holes in the legs and
into the rail mounts with holes. Enclose the dowel with the furring strips with partial hole
and attach the furring strips to the center section with two #6x1-1/2" wood screews
each from above.
Step 9 is to attach the leg assembly to the center section. Cut the 1/4" dowel into
2 pieces 1 3/4" long. Cut 2 pieces 3" long from the of 1x2 furring strips.
Drill a hole most of the way through but not all the way dead center in the
pieces of furring strip. Insert the dowels through the holes in the legs and
into the rail mounts with holes. Enclose the dowel with the furring strips with partial hole
and attach the furring strips to the center section with two #6x1-1/2" wood screews
each from above.
 Step 10 is to install the rotating locks. These are used to
keep the end sections extended when the teeter is in use. Cut 4 pieces 4" long
from the 1x2 furring strip. Attach each with a single bolt
where indicated in the phote, use a nylon washer between the lock and the
sections, and a locking nut to hold in place. Cover the exposed bolt with
a piece of aquarium air line.
Step 10 is to install the rotating locks. These are used to
keep the end sections extended when the teeter is in use. Cut 4 pieces 4" long
from the 1x2 furring strip. Attach each with a single bolt
where indicated in the phote, use a nylon washer between the lock and the
sections, and a locking nut to hold in place. Cover the exposed bolt with
a piece of aquarium air line.
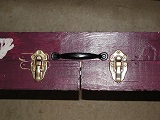 Step 11 Place the screen door handle onto one of the center section side rails.
Step 12 Use the draw latches as locks connecting one end to an end section and the other to the center section.
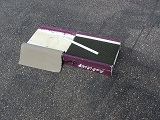 Step 13 Cut the carpet into two 1.5'x1' sections and one 3'x1' section.
Step 14 Cut the 1/2x3/4 quarter round into four 1.5' pieces and two 3' pieces.
Step 15 Use the quarter round pieces and the 4Dx1-1/2" nails to fasten the carpet to the base.
| Part | Qty. | Ea. | Total |
|---|---|---|---|
| 2'x4'x3/8" sheet plywood | 1 | $4.97 | $4.97 |
| 1"x3" furring strips | 3 | $0.85 | $2.55 |
| 1/2"x3/4" qt. pine wall trim | 12 | $0.34 | $4.08 |
| Hinges 2" narrow (2 pack) | 2 | $2.78 | $5.56 |
| Screen door handle | 1 | $2.79 | $2.79 |
| Draw latches | 2 | $2.38 | $4.76 |
| #8x3/4" wood screws | 40 | $0.05 | $2.00 |
| #6x1-1/2" wood screews | 28 | $0.05 | $1.40 |
| Carpet sq. ft. | 12 | $0.49 | $5.88 |
| 4Dx1-1/2" nails | 22 | $0.01 | $0.22 |
| Dowels 1/2" & 1/4" | |||
| Subtotal | $34.21 | ||
| Sales tax | $2.31 | ||
| Labor hrs | 8 | $0.00 | $0.00 |
| Total | $36.52 |